Note: Contrary to the last blog posts, this one is written in english, mostly to reach a wider audience. The vast majority of my old posts are talking about stuff I was learning when I was in school. This one might be a turning point where I start talking about more advanced stuff and future posts might also be written in english from now on.
Recently I’ve been working a lot on my home server setup and ended up tinkering with a lot of stuff before feeling confident delivering something to production. The primary purpose of said server is to provide myself, family and friends with multiples services. Among those, there are management interfaces, webapps, backup scripts, monitoring tools… Some are private, only meant to be accessed by me at home. Some are public, open to the Internet. Finally, some are reachable from Internet but subject to a strict access control policy. This means that sometimes I want to be the only one able to access a service remotely, but another service could be accessed by myself and a couple of friends.
All of these use-cases are important to me, and must all be working simultaneously. I also strive to keep as few servers as possible powered on 24 hours a day, because I don’t want to maintain a whole datacenter at home. Then, all the services will probably run on the same server, on the same domain (.morganridel.fr), all behind a reverse proxy.
To top it all, most of the services I use are open-source or free (i.e. awesome-selfhosted) and I don’t have direct control on their security and auth systems.
This post explores different methods to secure a number of services that you don’t have control on, both by leveraging the applications themselves or the proxy in front of them. We’ll learn the pros and cons of different approaches, allowing you to research more about your favorite ones and to implement a level of access control you are comfortable with. All of the examples assume services behind a reverse-proxy and in Docker containers, but the concepts described here can of course work in different environments.

I will NOT be describing all the possible auth systems, merely the ones I had the opportunity to work with in my own home setup. I will also try to stay away from deep implementation details. The runnable examples are small POCs and you will need to learn more to apply them in a production setup. If you want to expose services to the Internet, you will need to really understand what you are doing as auth is not enough security. HTTPS, firewalls, logs monitoring and maybe VPNs are examples of concepts to understand in order to secure an online setup. Please don’t expose anything to the Internet if you’re not confident in what you’re exposing or what you’re doing.
Since we started talking about access control policies, the concepts of authentication and authorization are emerging, it is important to clarify what we are talking about.
Authentication and Authorization
Often mixed-up in oral speech, authentication and authorization are actually different things.
When authenticating a user, we want to confirm its identity, the answer to the question “who are you?”.
When authorizing a user, we check resources he has access to, the answer to the question “what can you do?”.
Authenticating is often done through checking a user’s credentials, using information only he is supposed to know, like a password. It can also be done by using something he has, a 2FA code on a mobile phone, or biometric identifiers like fingerprints. We can of course combine multiple approaches to reinforce security. That’s why it is recommended to add 2FA to your email account in addition to your password.
Authorizing will depends on defined policies, for example all users who are admin will have access to specific pages. This is an example of Role-based access control.
In practical applications, both authentication and authorization are used. A user typically first authenticates itself to the system, then the system will authorize this user to access different resources depending on policies.
In our case, our examples will focus on authentication because we always need to know who the user is. Authorization will be derived from the authentication to allow access to an application. In most cases, the fact that the user is authenticated is enough to give him access (because we control who can authenticate). Defining granular authorization policies is often done by the applications themselves and we will not cover it in this post.
Run the examples
All the examples are Docker-Compose stacks that can be run with a single command in each folder example:
1docker-compose up
By default your system also needs to resolve every *.localhost domain to IP of the server where the examples are run (often 127.0.0.1). This should be the default with the localhost domain but if not you must edit your /etc/hosts file accordingly or setup a small DNS server like dnsmasq.
Also, take note that all the apps run in the same Docker network, which could be a security concern.
Make sure to stop any running example before running a new one. If you encounter cache issues when running examples after examples, try to clean your cache or to use a private browsing window.
Everything can be found in this GitHub repository.
App-based authentication
The straightforward way to authenticate a user is simply to let the application do its own thing. As I said, I often don’t have direct control over the way an application decides to authenticate my users, I can only hope that I’m satisfied with it. Less work for me, everyone is happy. The drawback of this approach is of course that you are completely relying of what the application provides you, if you don’t like it you’re out of luck (or are you?).
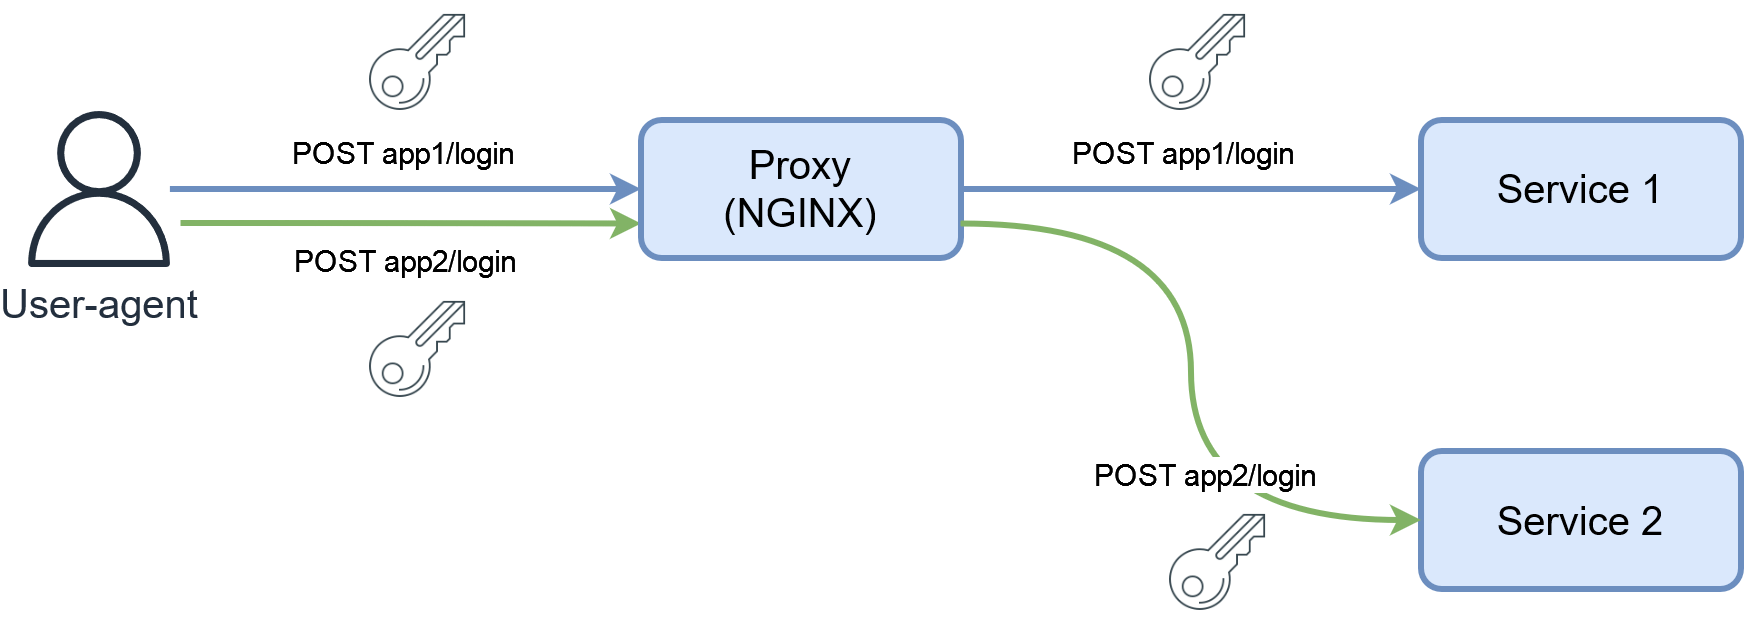
Let’s look at some possibilities you might encounter.
No authentication
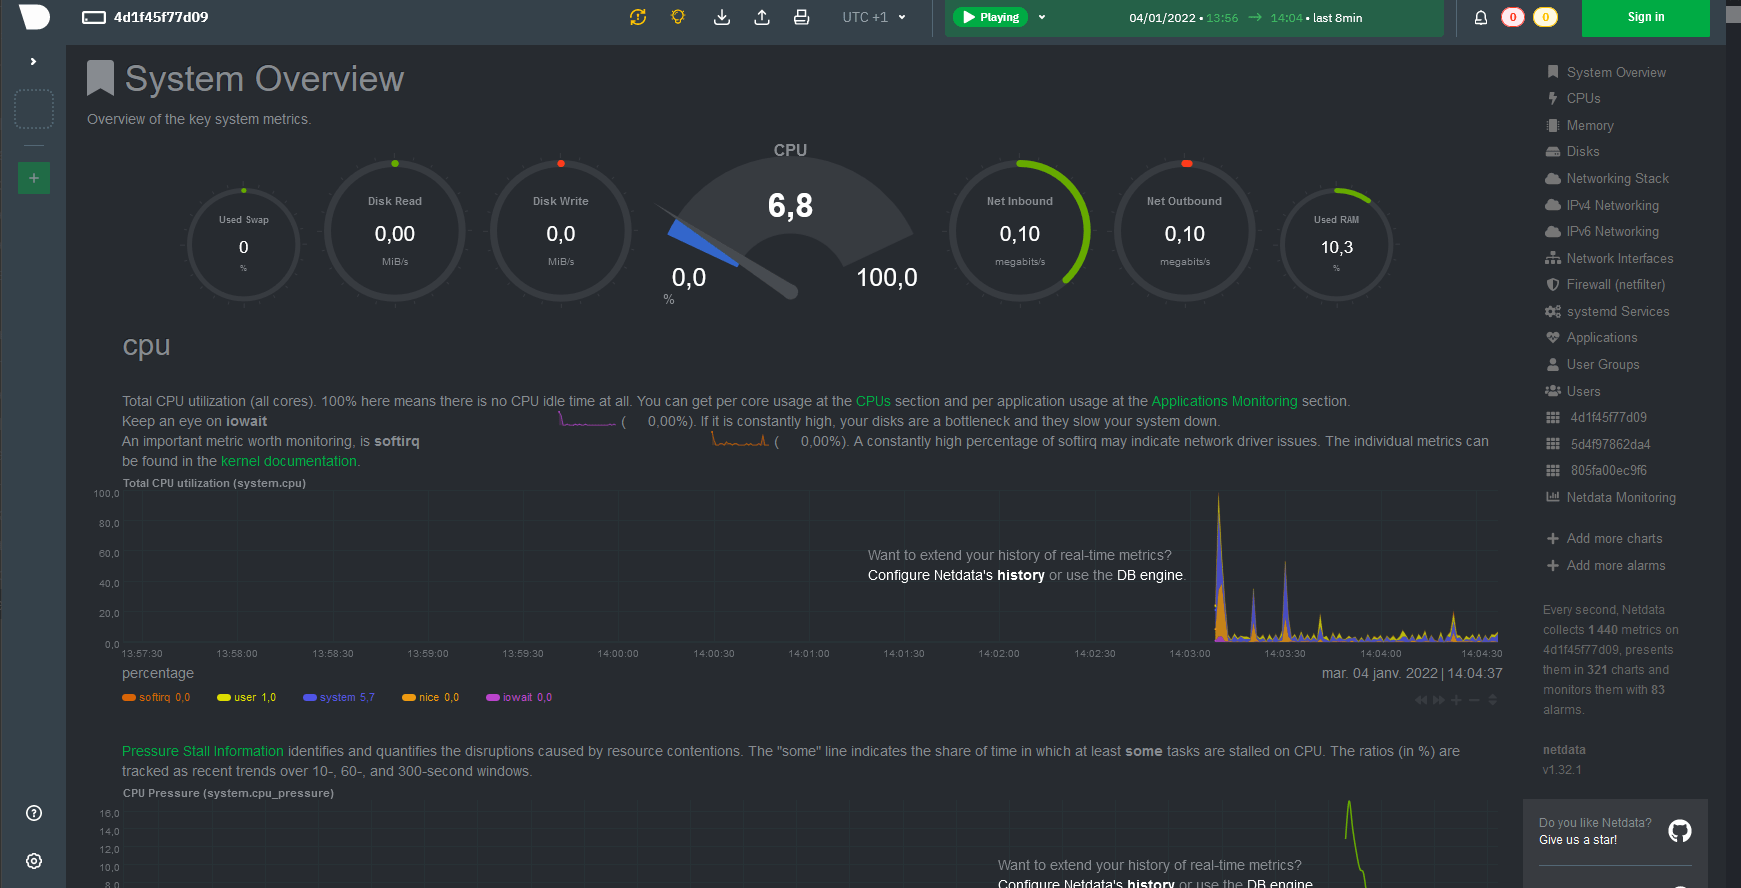
Yes. Some apps will just not provide any authentication and happily deliver their services to the first browser that stumble upon them. Some notable examples are apps like Netdata or blogs. Monitoring or dashboard apps can be found in this category. It can also be deliberate if the app offers a way to disable authentication.

What to do then? There isn’t much leeway here. You probably shouldn’t be exposing your app without authentication to the Internet unless it is something really public-facing like a blog or a showcase site. If your unprotected app is exposed and is manipulating data on your server, you are basically giving free lunch to anyone who can reach the open port. This also increases your attack surface if there is a vulnerability in the app.
If you run the example on GitHub, you’ll access the two apps directly at http://app1.localhost and http://app2.localhost.
This is a use-case when people can typically use a VPN to access the app which would be only exposed inside their home network. Personally, I like my internal apps like I like my public apps… secured. I wouldn’t want anybody on my Wi-Fi/LAN to be able to access internal tools like management interfaces, even if they were isolated on a separate network. So I’d want to add an authentication layer whether I access an app from Internet or from my own home (Zero-Trust philosophy). This doesn’t discount the VPN option as you could protect your app internally while only exposing it from Internet through the VPN if you really don’t want anything open.
All in all, this is a textbook example of where you would want to add proxy-based auth.
Internal authentication
Now your service has its own authentication system. It might be a simple password for access or a full-fledged user database with different permissions for authorization. You now have a basic layer of protection in front of your service. A lot of apps use internal authentication with access granted by a username and password, as an example I have personally used Tandoor for recipes. You can also self-host bigger projects like GitLab or NextCloud with such systems.
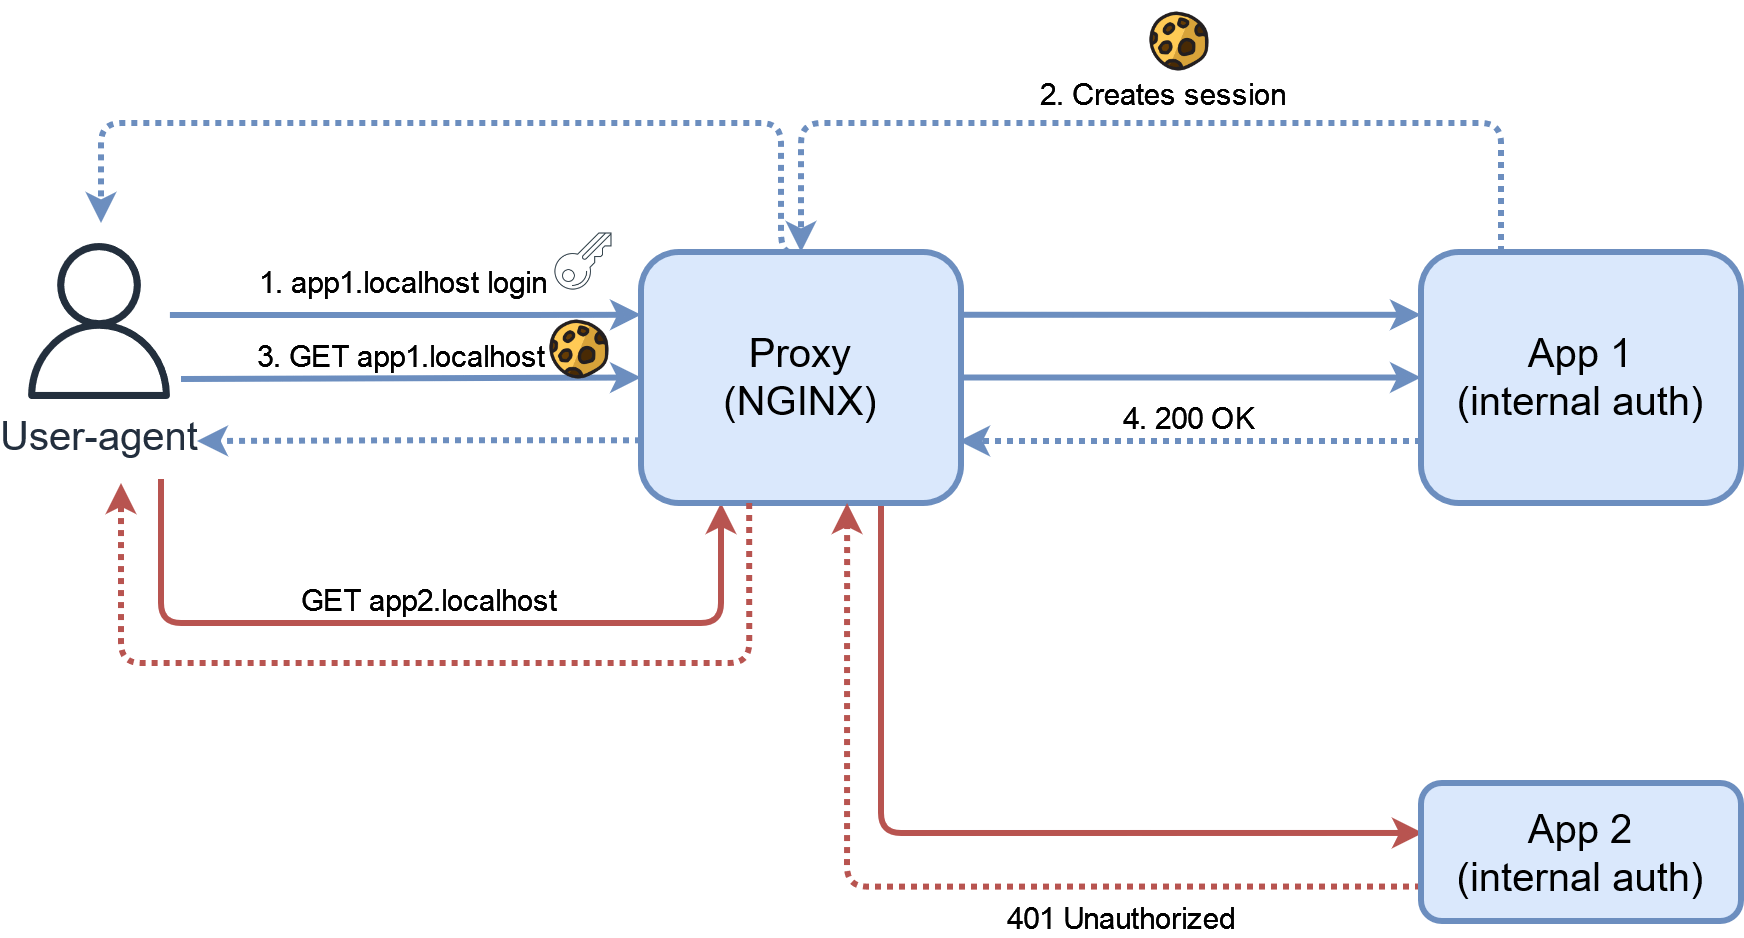
This is the classic way of authenticating that everybody is used to. You can run the Docker example from the code and will be able to authenticate to http://app1.localhost and http://app2.localhost with the correct credentials.
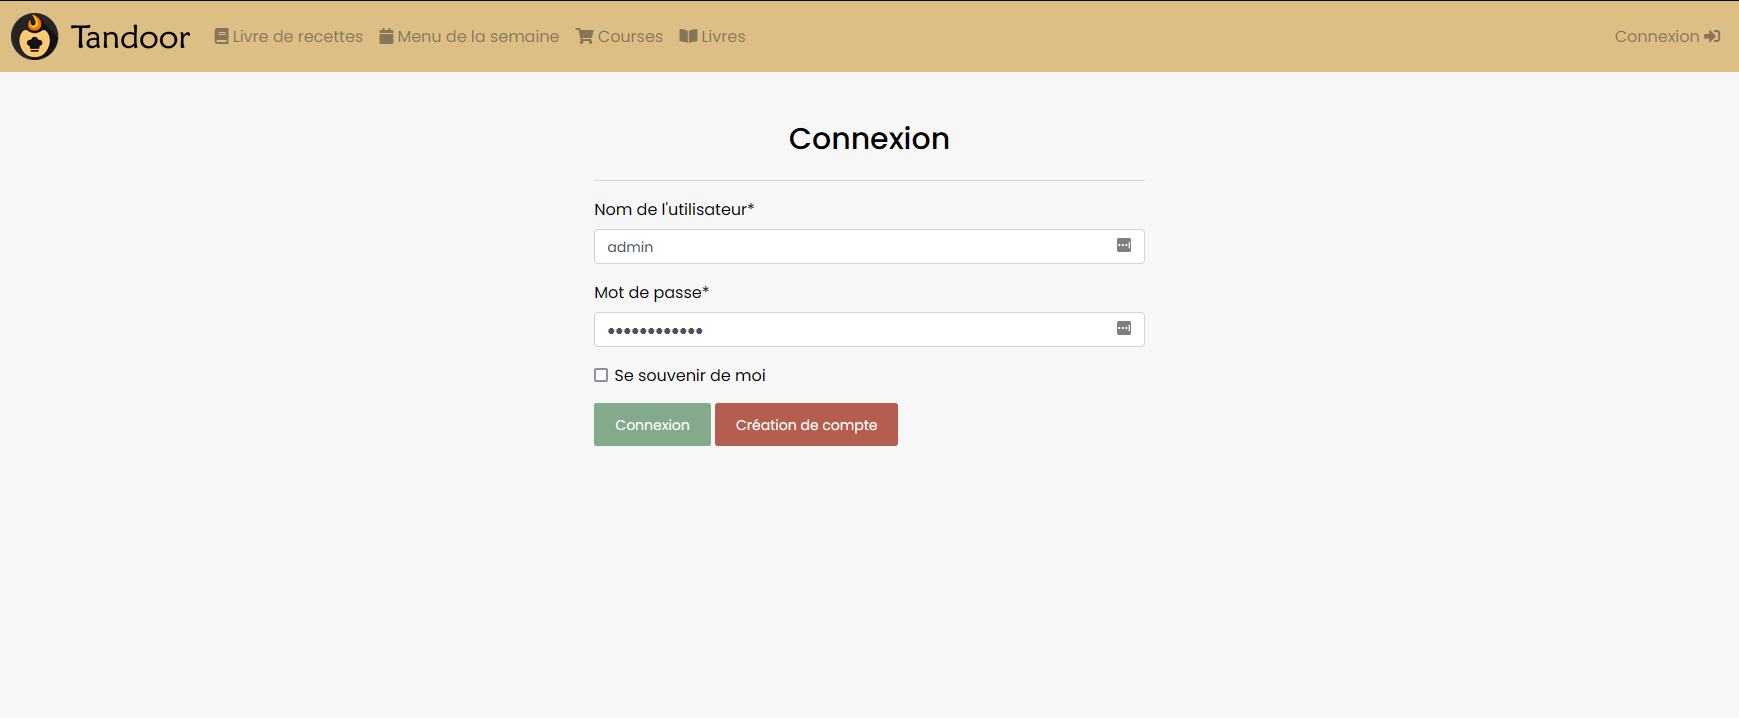
In our environment though there is a massive flaw with this system. Each authentication system is independant. In the example, after logging in Tandoor, I now have to use a different account if I want to log in the second app even if they are both hosted on the same server and intended for the same users. This is not desirable.
As a provider of multiple services under the same domain, if I host 10 apps with 10 authentication systems, it means that every user potentially has 10 accounts, 10 passwords (ideally), and must login to each service. This is terrible UX if I want to provide a unified experience to my users, even if the only user is myself!
And now if I want to add my long-lost sister as a new user, I must either ask her to register on a bazillion different websites, or have to create a new account for every app manually! Admittedly, I get the benefit of per-app access control. I can allow only a subset of my users to have accounts on a subset of my apps. I also don’t have to work too much beside managing the accounts, everything is handled by the app’s features.
Security-wise, this should be enough to expose an app on Internet but it’s not perfect. The app security depends on the robustness of its own auth system, but if there are any security breaches, they might not be exploitable before logging in.
“Your security is only as strong as your weakest link”
The more apps you expose with different authentication systems, the more chances they are that a security risk exists somewhere.
However, famous apps like Nextcloud are often directly reachable without any major problems. In general, you’re better off using apps already exposed to the world by the community without any hiccups and if they are open-sourced they can be improved as time goes on.
“But what about that thing where I can authenticate anywhere with my Google or GitHub account?”

OpenID Connect and OAuth2
OAuth2 is an authorization protocol that allow a user (resource owner) to delegate some his accesses on a service to an application (relying party or client).
OpenId Connect is an extension of OAuth2 to handle authentication.
We won’t dive deep into OAuth2 as it is a very large subject. I can only recommend some resources to you if you want to learn more about it. OAuth 2 in Action is a book I have read that explain the different OAuth2 flows in great details as well as providing example implementations of an authorization server and client. You can also read the different specs for OAuth 2 or OpenID Connect.
What you must understand today is that OpenID Connect is basically allowing compatible apps (clients) to delegate authentication to an authorization server, effectively centralizing authentication to this server. This allows a user registered on the authorization server to log in multiple unrelated apps with the same account, which is great for our use-case.
It is also the protocol which provides the magic behind being able to log in any website with your Google account.
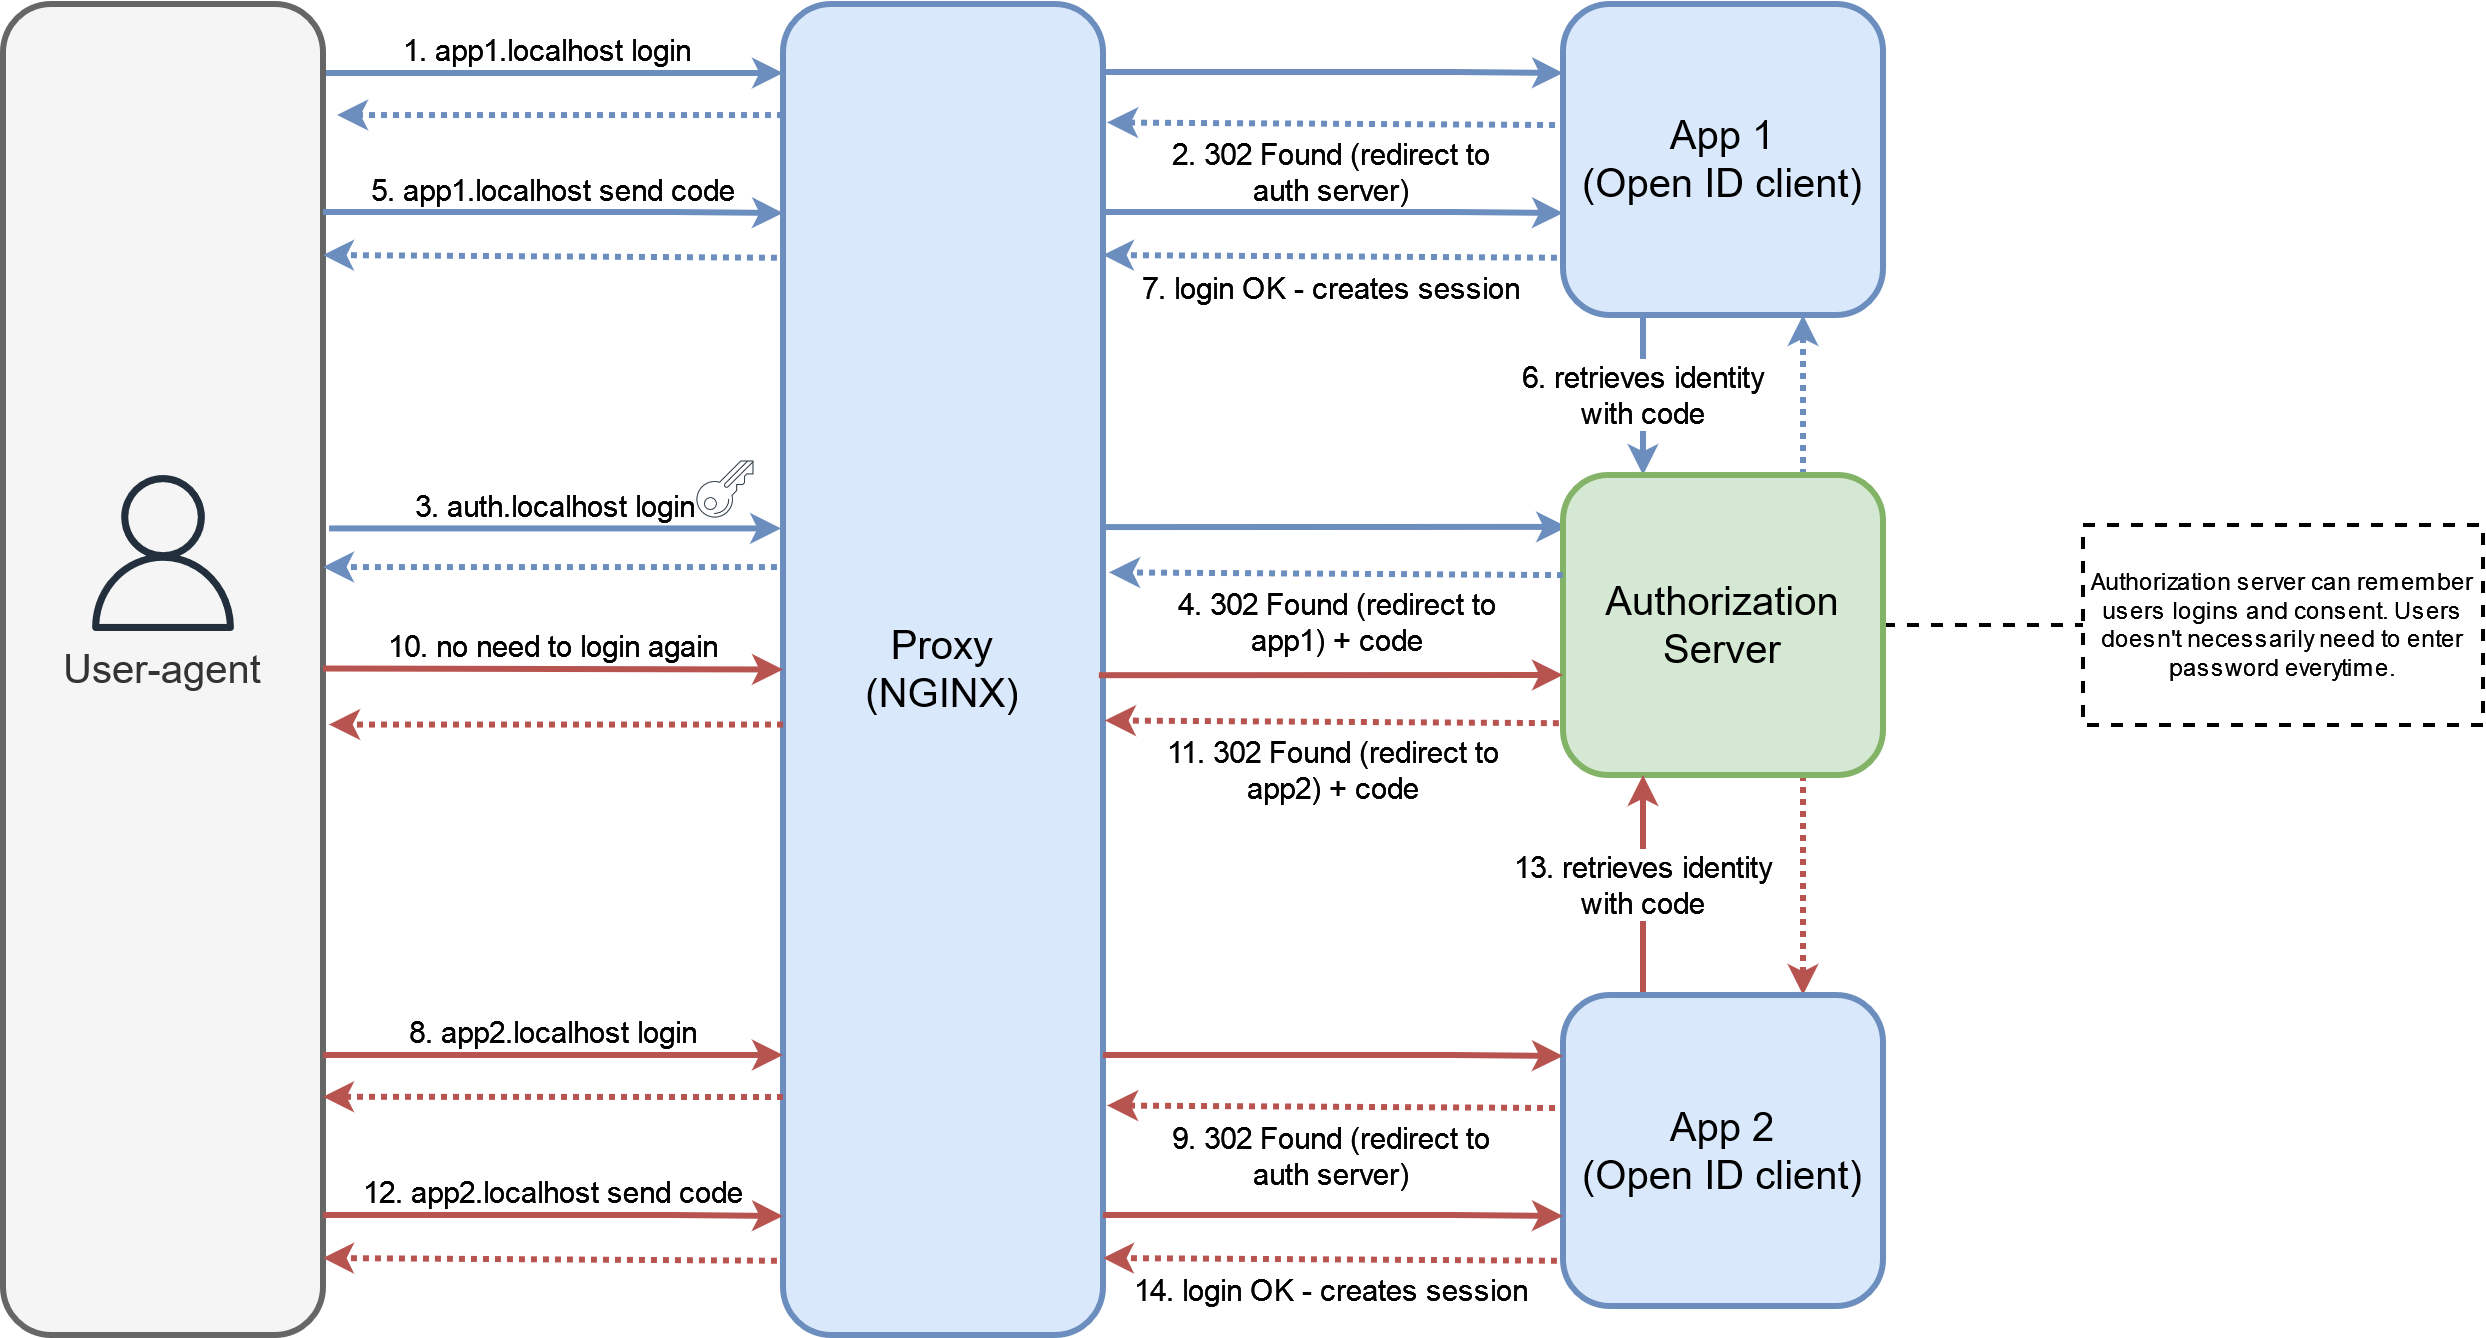
The above schema is a simplified representation of the OpenID Connect authorization code flow, each compatible apps will redirect the user to the authorization server to login. If the server confirms the user identity and consent, the user is redirected back to the app with a code that the app can use to retrieve a token with the user’s identity. Since the session is held by the authorization server, the user might not even notice the redirects for future logins as he wouldn’t need to enter his credentials again.
With such a protocol, we can vastly improve the user experience for our different services, as long as they are compliant OpenID clients. If one user tries to log in to an app, he will be redirected to the authorization server to authenticate. To log in another app, the user could use the exact same credentials. Even better, if the authorization server is keeping a session for authenticated users, they could use multiple apps while authenticating only once. This level of authentication is often referred to as Single Sign-On or SSO.
In the linked code example, we are self-hosting our own authorization server behind the proxy along with the other apps. Each app is configured to use this server as an authentication method. I developed a small app that will only handle OpenId authentication and display the resulting information about the user on a web page. Once setup, You will notice that you can use both deployments of the app with the same credentials.


In a production setup, you could use an external authorization server such as Google or Auth0 but you could also host your own with something like Keycloak or Ory Hydra.
Another benefit of centralizing authentication is of course that you only need to manage users at the authorization server level, which features adding new users in one place for all apps. However, your apps could require you to manage authorization details at the app-level because they might want to define themselves who can access what. Moreover, you can increase security for your whole architecture by forcing user to add 2FA on the authorization server, at a single place.
But if your app is an OpenID client, you must beware of the default behavior after a login. Maybe your app will give default read-write access to an authenticated user. Then every user you add to your authorization server will have access to your app. Worst, if your authorization server is Google and your app is exposed, this will allow anyone with a Google account to access your app. This could be mitigated by configuration at the app or at the authorization server level.
If all your apps support OpenId Connect you will have perfect unified authentication across your domain. In real-life though, in a situation like the one I described where I am using completely different apps for personal usage, you are likely to want to host some apps that aren’t OAuth2 friendly or that won’t have authentication at all.
You could be really strict about what app you want to host, or you could consider implementing proxy-based authentication.
Proxy-based authentication
As we discussed earlier, you are likely to host apps with heterogeneous means of authentication. Some might be compatible with OAuth2, some might have their own systems and some might don’t have authentication at all. Fortunately, your proxy is likely to support a few way to authenticate an user before they even reach your app.
The idea is that since all the requests will pass through the reverse proxy before reaching the app, it could handle authenticating the user before forwarding the request to the upstream app. Hence we could add an authentication layer to any app in a totally independent way.
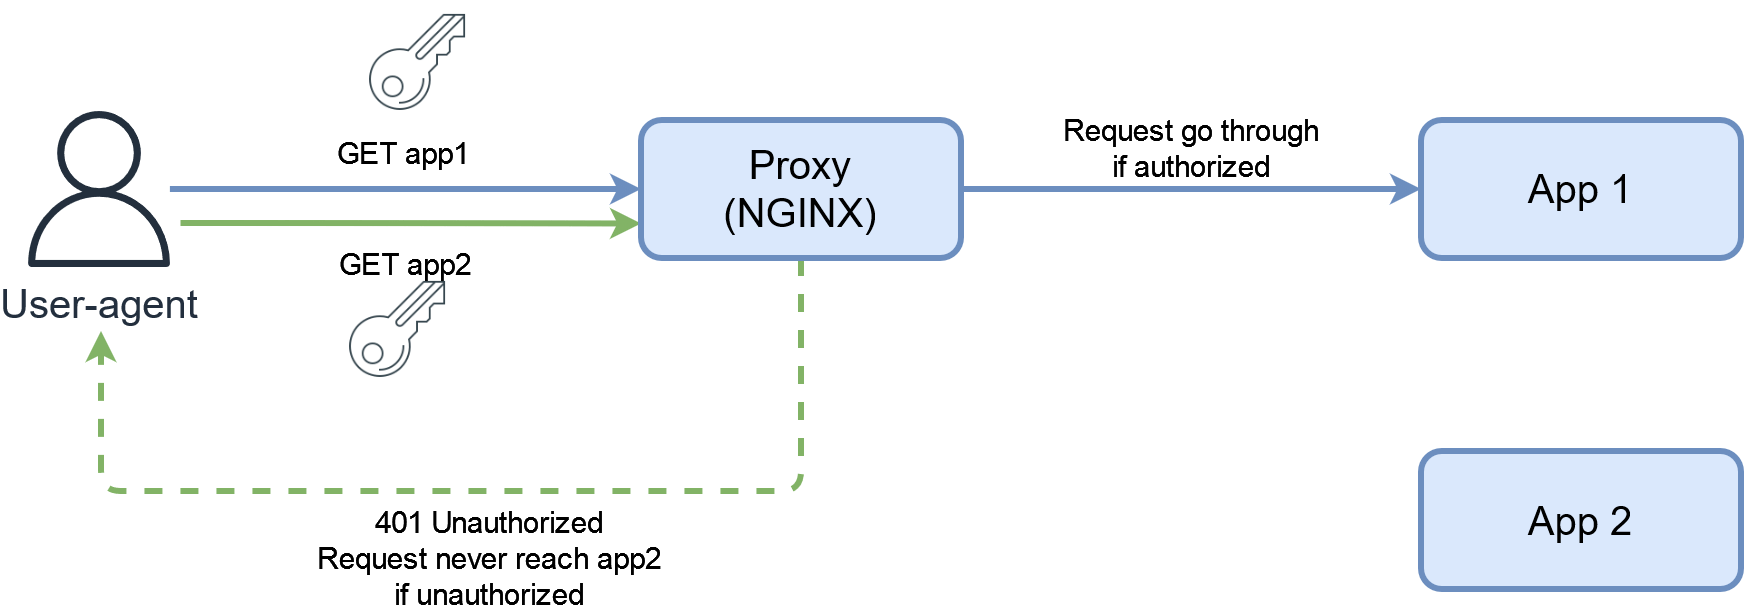
In reality, we should rather be talking about authorization here, as the proxy is deciding if the user user has access to an app URLs, not only checking his identity.
While the advantage of authenticating the user at this layer is independence from the app, it is worth noting that we must be really aware of the HTTP requests source. Indeed if for some reasons, someone can send a request to an app without using the proxy port, it would completely bypass the authentication in place. This could happen if your app has its port exposed on the local network for example. It is then really important to make sure that requesting the proxy is the only way to talk to an upstream app (except maybe for local development or debugging purpose).
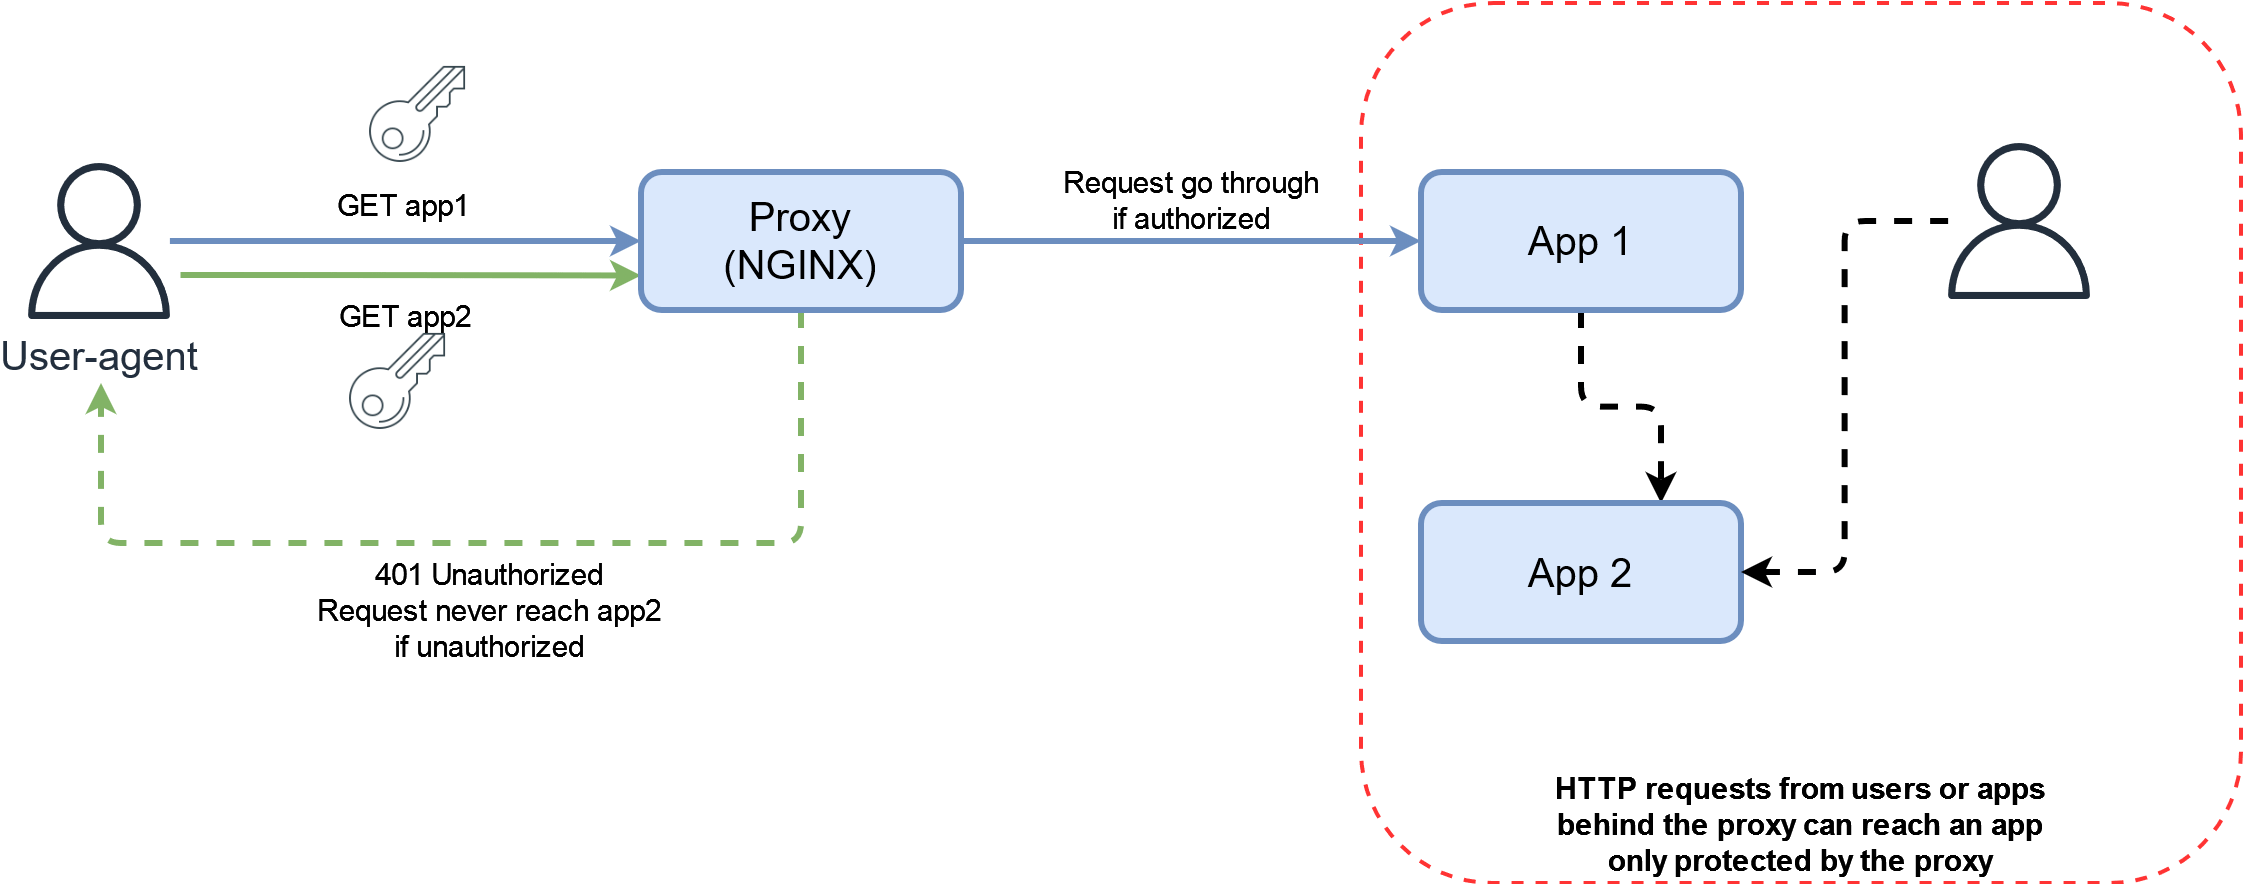
Also, if the upstream app has its own authentication and no way of disabling it, or “understanding” the proxy authentication, users will need to authenticate both at the proxy layer and the app layer. This could or couldn’t be a dealbreaker for you depending on your use-case and if you want your user to even see the front-page of an app without authentication.
The examples here will all be based on Nginx but almost any alternative such as Traefik or Caddy will have some similar features.
Basic auth
This is a great way of adding simple authentication for apps without any. Basically, the proxy possesses a list of authorized users and their hashed password in the form of a file, and the browser will ask the user to authenticate when trying to access an app.
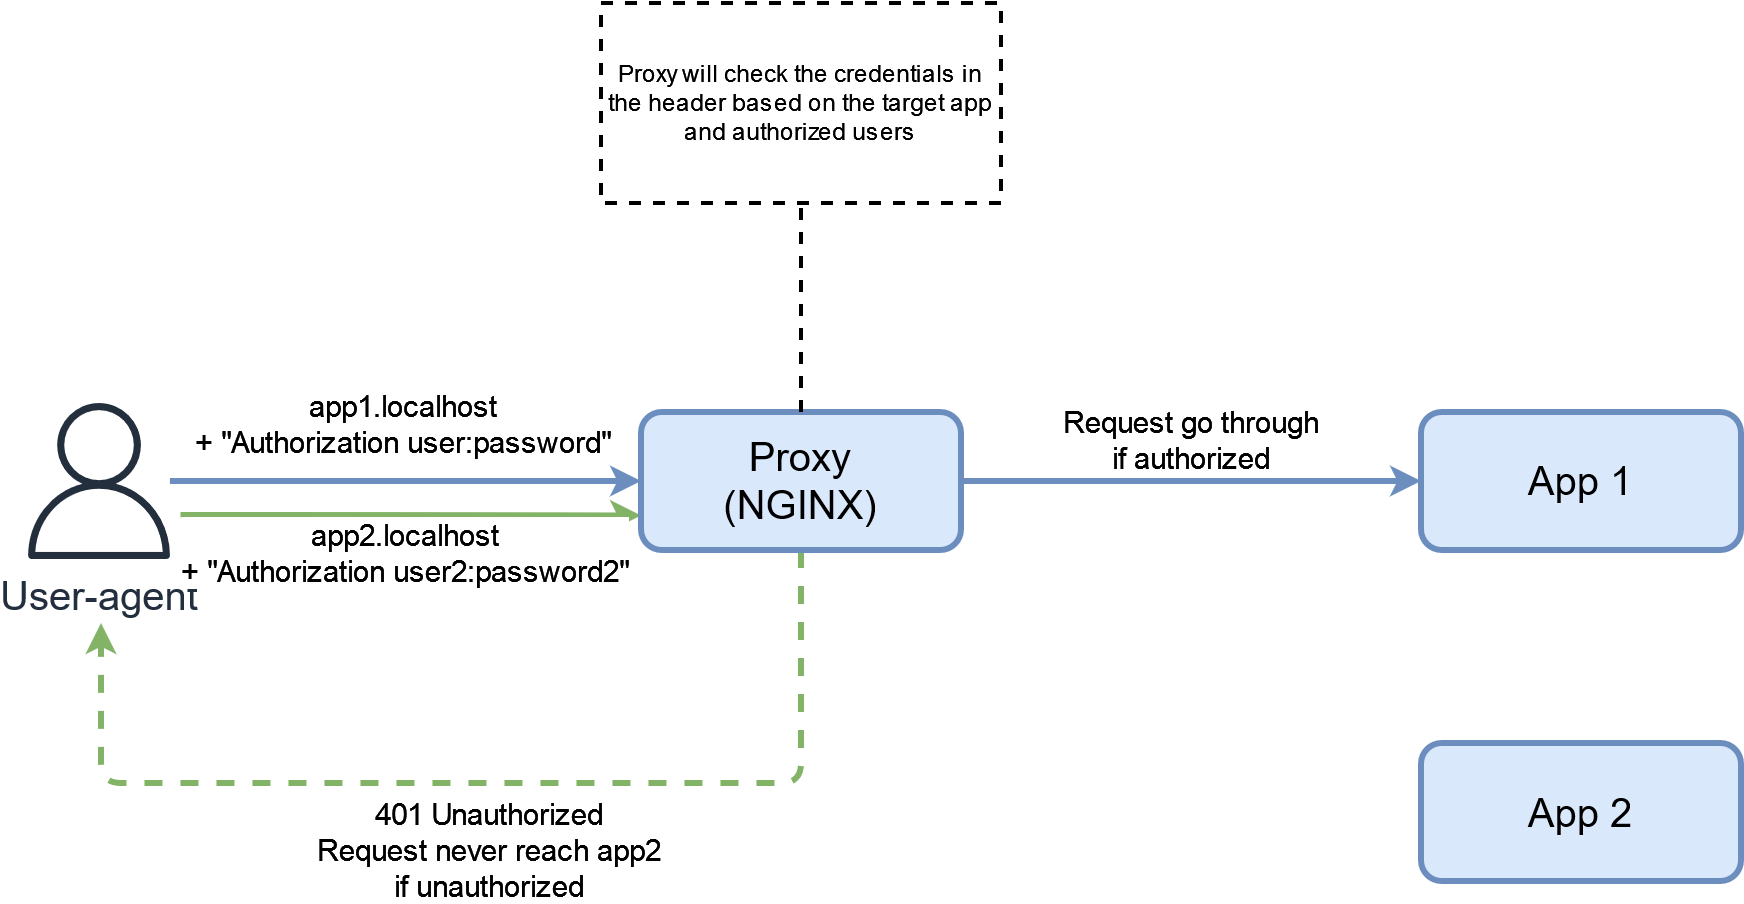
You could use the same user database for multiple apps or different one depending on authorization level.
There is not much more to say about basic auth. If you run the example, you’ll be able to access both apps if you enter the correct credentials.

If your app had internal authentication, you would need to login to the app even after basic auth. However, Netdata is open by default and is now more secure with basic auth.
As for exposing a basic auth protected app to the Internet, you must consider some security issues. The username and password entered by the user are cached by the browser, so anyone with access to your machine could retrieve it to login in the future, then the credentials are sent with every requests like with a session cookie for example (except the session cookie isn’t directly your password and is not valid indefinitely) and the app won’t have control over invalidating your session and can’t log you out.
Several users can have different passwords, so this is still better than a single account or allowing everyone in a specific network. Without any additional measures, someone could also try to brute-force passwords as long as they can send unlimited HTTP requests. Assuming you are well aware of these facts, you can decide if it’s secure enough for you to expose.
HTTP header authentication
This method is a bit of a hybrid between app-based and proxy-based auth because the app needs to be aware of the system in place.
This authentication method relies on a defined HTTP header which the upstream app will trust as being the authenticated user identity.
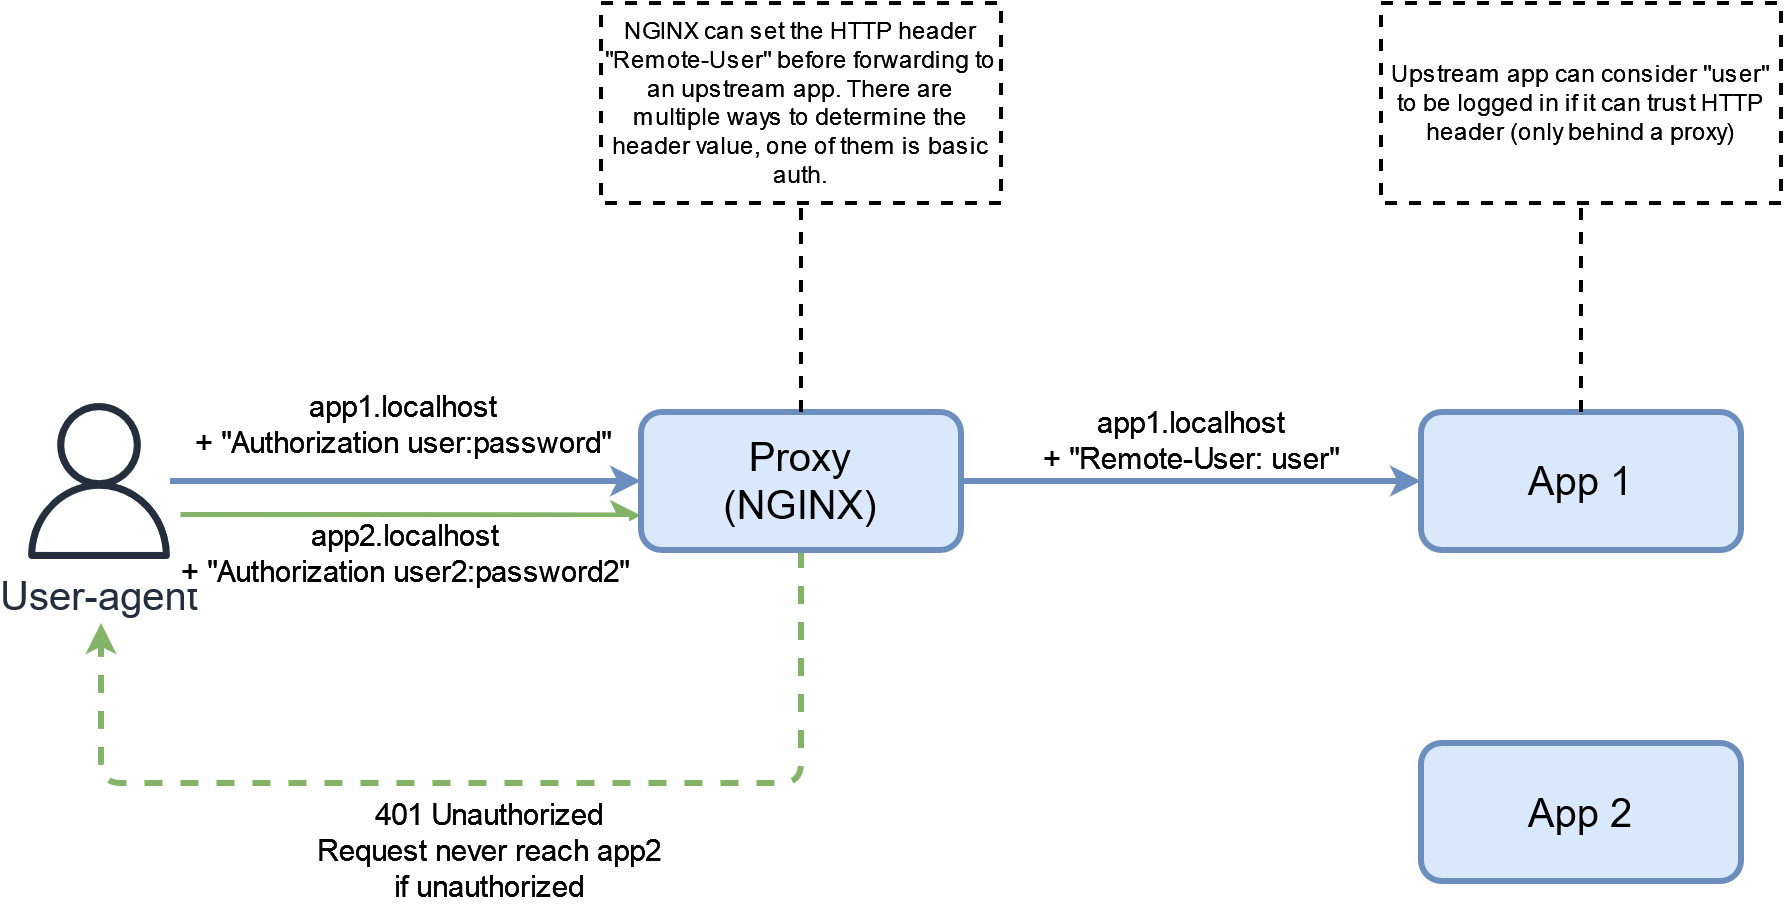
Since the proxy is sending the final request to the app, it can modify the HTTP headers to add information about an authenticated user. The proxy can then decide of how to determine the header value. One way of doing that is to build upon basic auth by using the authenticated user as the header, usually X-Remote-User. Then the application is configured to trust the aforementioned header and you now have an app that can understand basic auth from the proxy!
Running the example, you can login to both Tandoor and Firefly with the same basic auth credentials as both apps will trust the header. This is essentially “Same Sign-On” based on basic auth.
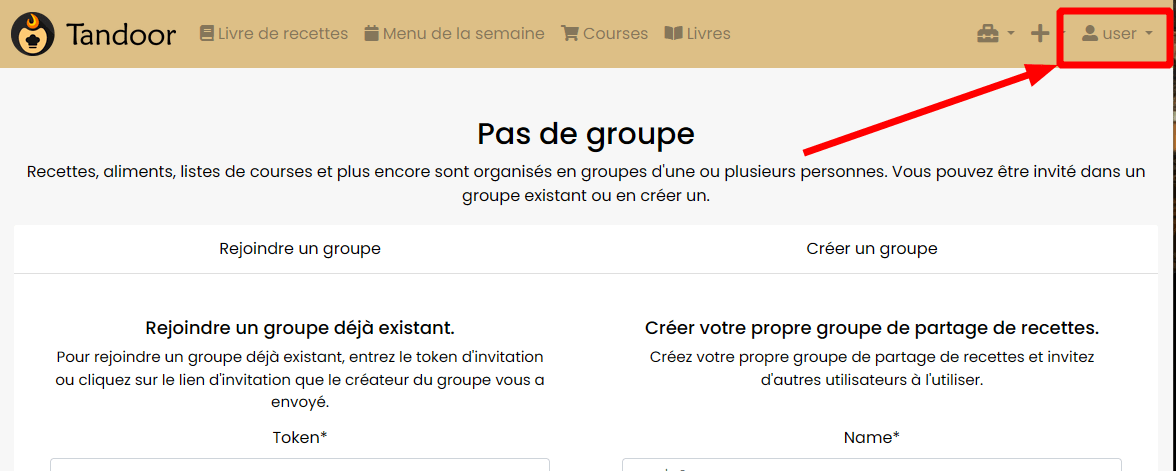
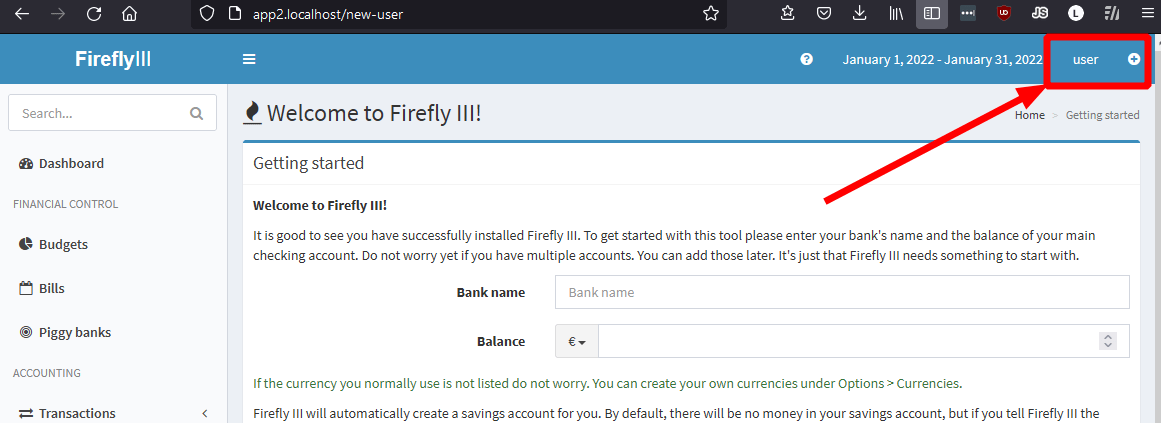
As stated, the upstream app will blindly trust the HTTP header in the request. Any request received outside the scope of the proxy can impersonate any user. That’s why it is also important to make sure that the proxy overrides the header in all cases, to avoid people crafting request to log in as anyone.
Exposing the app to the internet would be as secure as the method used to obtain the HTTP header, in our example it is based on basic_auth.
Auth Request module
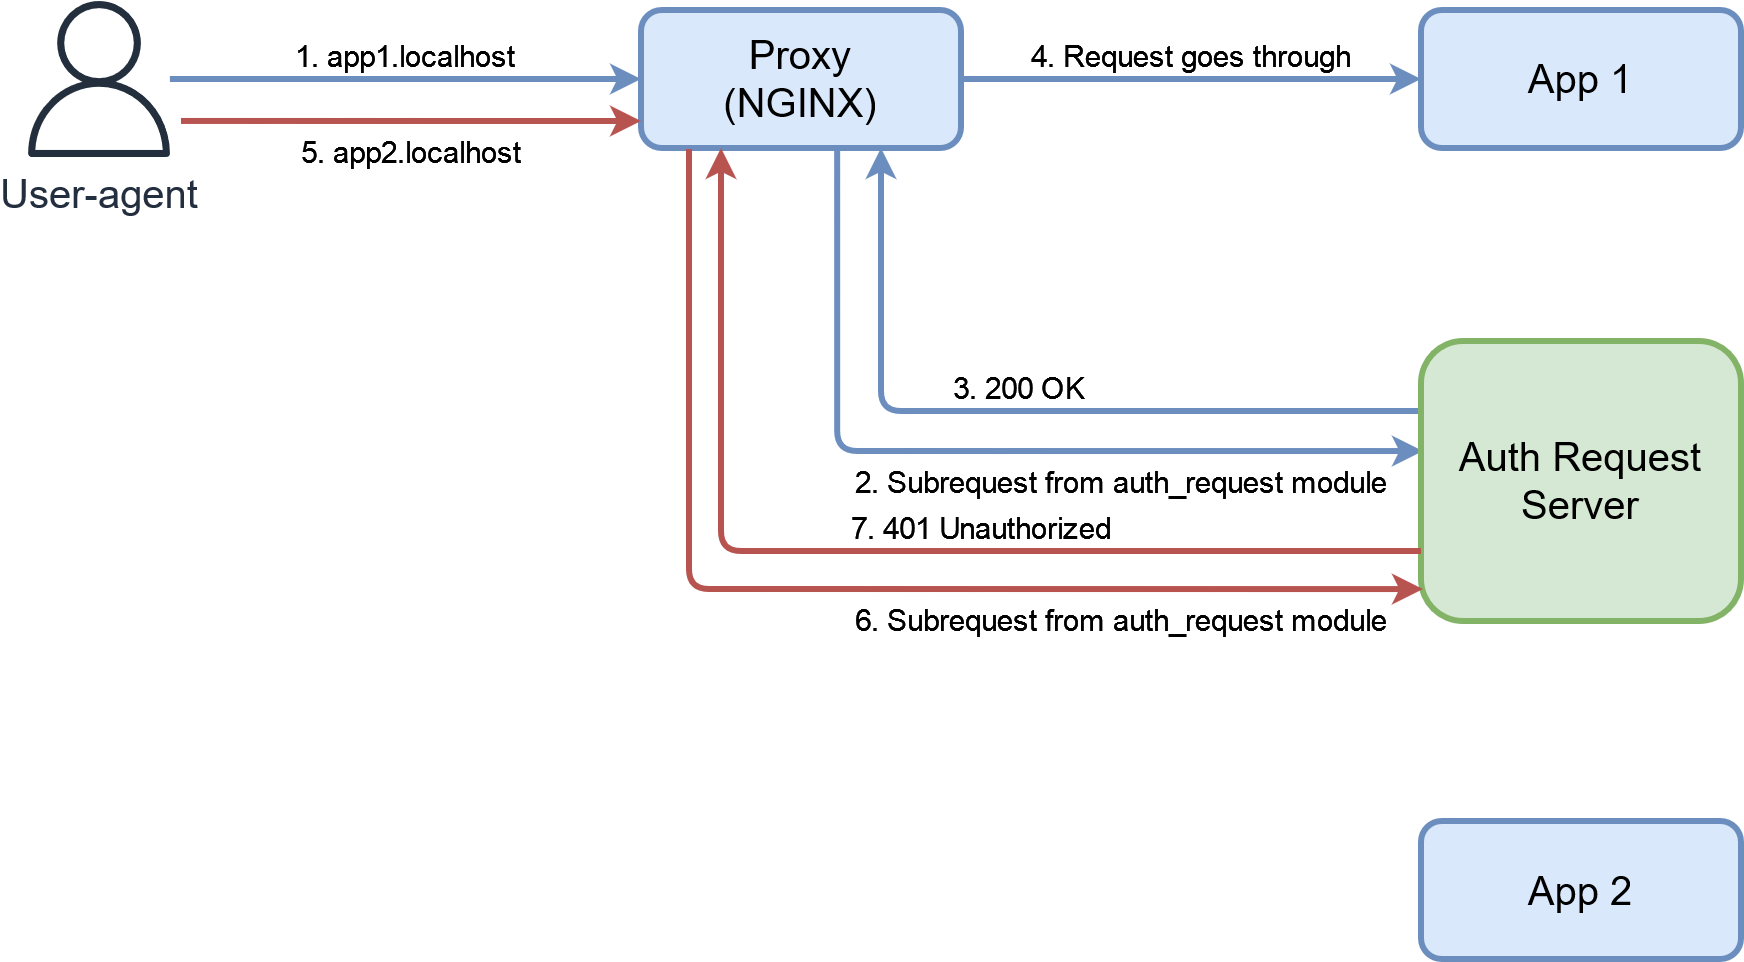
The auth request module contains NGINX directives that delegate authorization to another endpoint. Put simply, if the endpoint returns any 2xx HTTP code, the user is allowed to access the resource, if either 401 or 403 is returned then access is denied.
The module is quite versatile as one could implement a simple password protected “auth request server” or a full-blown authorization server keeping a user session for future calls after authenticating.
As with basic auth, if the user doesn’t handle this step successfully, he will never see a single page of the upstream app.
I am personally using Authelia to authenticate and authorize access to most of my services.
Authelia will remember the authenticated users, bypassing the login screen for consecutive accesses and can handle 2FA. It can also do authorization with its policy system to allow different users to access differents apps.
In the example we are using OAuth2 proxy instead to authenticate to both apps at app1.localhost and app2.localhost with users defined in the configuration.
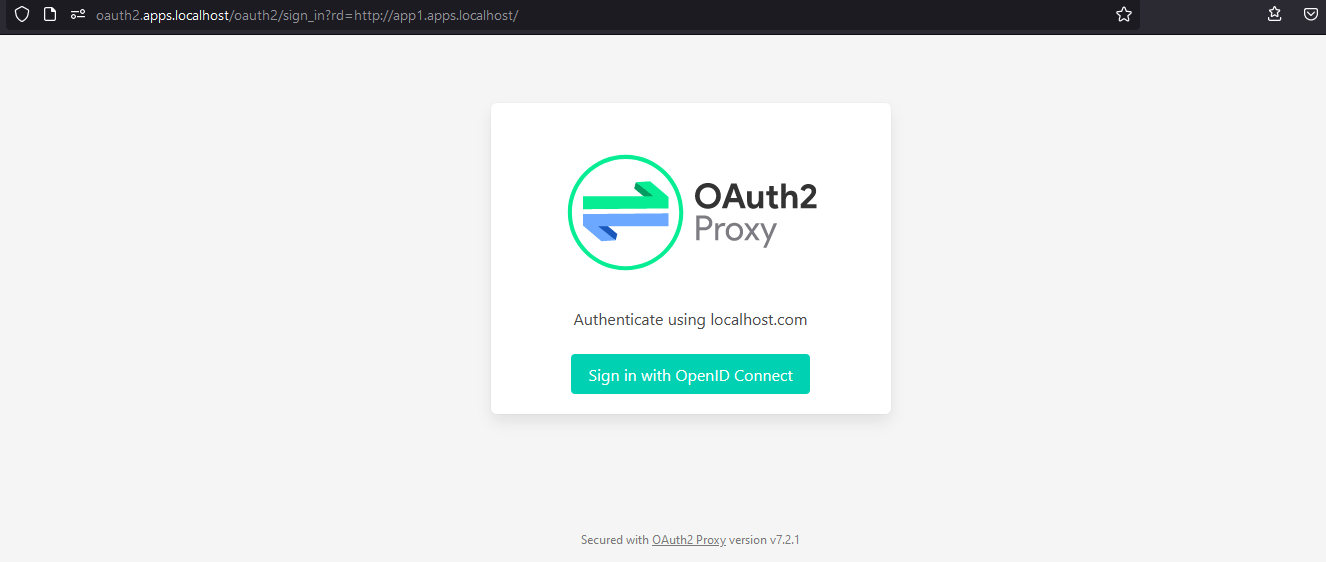
OAuth2 proxy will use another OpenID Connect authorization server as a backend to provide authentication on an endpoint compatible with the NGINX auth request module.
This is still proxy-based authentication, hence the app will probably not be aware of the authentication and users will need to login again if there is any internal authentication. However the auth request module can also add headers to the request to work with HTTP header authentication.
I personally trust Authelia for exposing apps to the Internet as I can force login through it before accessing any apps, making it the only exposed attack surface. It can also be configured to ban IPs after too many failed password attempts. The same thing can be done with an authorization server as long as you trust it.
Some caveats though, using the auth request module will probably break any mobile apps (Nextcloud comes to mind) or external API access as those won’t be able to handle the extra steps before accessing the app.
Combining the best of both world
We’ve explored various ways of authenticating, and you might prefer one or another depending on your individual situation and the experience you want to give to your users. In reality, for a home setup based on apps developed by other people, it will be hard to make them all work together to provide a single sign-on experience, unless you make the app’s auth system a mandatory criterion for self-hosting it.
Currently, the best bet is probably OpenID Connect. Since it is based on delegating auth to an authorization server it will provide the same login experience for every app. If some apps aren’t compatible clients, you can use proxy-based authentication with the auth request module and something like OAuth2 proxy. This will make sure to redirect user to your favorite authorization server and the same login page that your users are used to, no matter what auth system the upstream app actually supports. This is a great way to further unify the auth system between OAuth 2 compatible apps and the others. The only caveat would be double authentication if the target app has its own internal authentication. But this could be bypassed too with HTTP header auth set from the authentication step.
It is worth noting that OAuth2 proxy can authorize users depending on a group on the authorization server but contrary to Authelia it won’t authorize depending on the target URL. You might need to run multiple instances if you wish to let differents users access differents apps.
Conclusion
While app-based authentication is the default on most setup, it can quickly become a pain for users as they need to remember more and more credentials for all the different apps. Unless all the services support OpenID Connect, using proxy-based authentication is a great way to fill the gap when you don’t have control on the hosted apps in a home setup.
I am personally using Authelia to secure most services with HTTP header authentication when applicable. I really like the policy feature because it makes Authelia work like an Identity-aware proxy, providing authentication and authorization for any type of service. There is also a experimental OpenID Connect authorization server feature which I look forward to use to further improve the SSO experience. This is just what I’m using and maybe it won’t fit your needs. Pomerium is an alternative if you want an identity-aware proxy backed by a real authorization server like Keycloak or Google.
Most of the examples shown in this post could be applied to another architecture, like an ingress controller in a Kubernetes cluster, although some might need some tweakings.
I didn’t mention all authentication means, for example your users could be backed by a LDAP server and a lot of apps are compatible with it, it could be a perfectly valid way of authenticating users depending on your setup.
Don’t forget that authentication is not enough security. If you don’t use HTTPS, you’re basically leaking all passwords to the network whatever is your authentication method. You could also harden the setup by filtering IPs by subnet on NGINX and use fail2ban.
If you find something wrong in this post or think something might need clarification, feel free to contact me through one of the means listed in the blog.